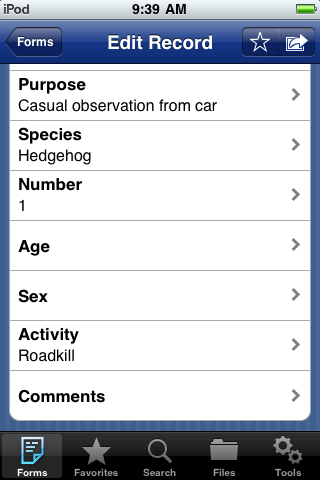
Sam Willyams demonstrates how to enter mushroom/fungi sightings into NZBRNFor this tutorial we will be entering in a sighting of
Amanita muscaria (see picture to your right). It may be an actual sighting or you may just follow along and not save it at the end.
To begin with open the
Biodiversity Recording Network website. There you should see six nice pictures of various life-forms each leading to a respective portal. Before you can input a sighting you need to register and logon. To register, the button to do so is conveniently located above the fungi portal. If you've got ahead of yourself and are already in the fungi portal then you can get back by clicking on "main portal" to the left of the top bar. Be aware that inactive accounts get deleted in about a week, so if you don't create a record soon then you'll need to make a new logon.
Follow the registration process, wait for an email then login. It is best to change your password now too. Click edit your profile next to logon, then click change password.
Creating records: 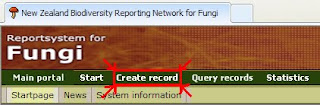
To get started click the fungi portal and then 'Create Record'. Be aware that the website may appear not to respond when you click a button. Don't worry, it usually just takes a few seconds before responding visually.
For this tutorial we will be enter just a single record so we'll click '1. Select purpose' rather than imputing using an excell spreadsheet.
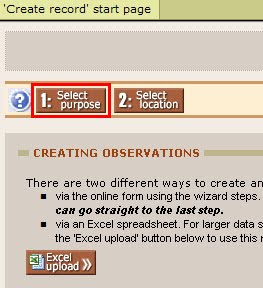
More...The first step is to create a purpose of the record. As you see by clicking the drop down menu, there are several purposes which you can select. These will show along with the records so whoever is viewing the records can know why or where from the record was created. You can make new purposes for yourself by clicking 'personal' on the top menu, then clicking 'my purposes' on the secondary menu inset from the top menu. It is not necessary to choose a record so we will leave this section empty. For the demonstration purposes, click the purpose drop down menu and click "personal". We now have purpose: 'personal record' displaying near the top. Click on the text to remove the purpose and continue onto location.
 We'll get started by entering a location. In my instance I will be using the location I actually did find some. You may either use the location you found some or if you didn't, just enter any location you want.
Start by clicking the google map button. Zoom in a few times with the scale bar or the wheel on your mouse. If you use your mouse wheel than the location of your mouse will be where you zoom in on. Otherwise you will have to hold left click and move the mouse to drag the map or click one of the arrows to pan the map. Once your close enough in, then a lot of blue markers will all over the map. These markers represent named sites across New Zealand and are fairly comprehensive.
Unfortunately it seems that many markers aren't quite in the exact right spot. Don't worry about this, if the site exists then use that rather than one in the exact right location, as everyone knows where the real location is and the marker might get moved to the right location later. Hover your mouse over a marker to get its name. Once you've zoomed in to the right area, we'll make a new site like this one:
 1. Finds an address and makes a new site there. Street addresses including abbreviations and place names all usually work. Note that it will make a new site even if it a site exists.
2. Finds a grid reference and makes a new site there.
3. We can name the site and use it or just save it as coordinates alone.
To make the new site by clicking, we just click on the place we wish to create the site. If you get the site in the wrong place we click somewhere else. As useful as the google map tool is, we encounter a slight flaw. Clicking to drag, making a new site and choosing an existing site all use the left mouse button. To avoid mistakes (in Internet Explorer): when dragging make sure you hold the mouse button for at least a couple of seconds. When making a new site, just click quickly and don't move the mouse, it will use grasp animation and may move the map slightly, but it should still make a new site in the right location. To choose an existing site, hover your mouse over a marker, the cursor should change to a pointing finger rather than an out-stretched hand. Wait to ensure the cursor is a finger before clicking, after a moment the information box should appear so you can click 'use this site'
If you are using a pre-existing site, this process is made much simpler by instead using search common site. Click on the name of the site from the resulting list to select it. Check to make sure the right site has appeared at the top of the wizard.
I decided to use a pre-existing site (Quail Island) rather than a more accurate new site Quail Island, Leper Colony, because this gives researchers the ease of finding all Quail Island records without the need to examine the map.
With the site selected, it should appear in text at the top of the wizard. You can continue by clicking 'create'.
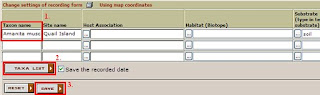
Here we can fill in one or more sightings. Under taxon name (1.) type “Amanita muscaria” or click on the taxa list button and type part of the name or a common name to find the appropriate name.
Once we are finished we'll click save. However first you should fill as much other information as possible. You don't need to fill everything in the more you can do the better. Scrolling across the page, here is what you should see:
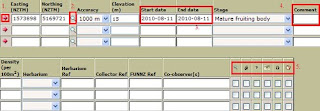
1. The little arrow is there to convert your nzmg (map grid) coordinates into NZTM coordinates. This is necessary as you may only input NZTM references.
2. The magnifying glass button will open a map with the location so you can check it. You can also click to mark a location. The check all markers button appears not to work.
3. Don't forget to check the dates, the default is the current date so unless you're imputing the data on the same day as you found it, it will be incorrect. The date is in YYYY-MM-DD format, so make sure you get the day/month the right way around.
4. Under comment I'm placing the number and precise location.
5. These are various additional options. Hover your mouse over them to get a description.
Finally if you didn't actually find some Amanita muscaria then we will make a personal comment stating “This is a fake recording”, so if you do make a record, everyone will know it's fake.
Scroll over to the left and click save, unless you haven't found any yet, if that's the case just move away from the page.
Congradulations on finishing this tutorial. I hope you have a fairly good idea how to input records now. If you need any help then feel free to leave a message.