
With this nice photo, NatureWatch NZ user Stephen Thorpe was able to ID it as a green soldier fly in the genus Odontomyia.
NatureWatch NZ observation by Grahame.
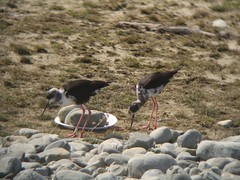
Why photos? Photos are helpful for several reasons. Photos confirm for other people that you saw what you say you saw. That gives NatureWatch NZ reliable data for understanding NZ ecology. Photos can record interesting behaviours and interactions (like Nicola Baines' incredible observation this month of a bellbird feeding a young silvereye). And, photos allow other people to identify the things you don't know.
One of the game changing things about NatureWatch NZ is its "ID please" feature. You post the photos and other members of the NatureWatch NZ community will do their best to figure out what it is. It's a miraculous thing for those of us used to crawling through dusty scientific identification keys. What you might need a few hours, or a few years doing a science degree, to identify, someone else might happily identify with a glance. Usually, all you need are those good photos. Keep reading for some handy tips, like holding your camera up to your binoculars.
More...
Get close, stay focused
If you're photographing a skittish creature, take a photo or two as soon as you see it before it might fly off. In this age of digital photography, there's no harm in taking a few photos and keeping the good ones. Still, once you've got a usable photo from where you're standing, try to get as close as you can. Fill the frame of the image as much as you can with the species. This is especially important with lower-resolution cameras. Fit as much information in your photos as you can.

A nice photo of a hebe flower but not of the native bee pollinating it. Get as close as you can.
NatureWatch NZ observation by Colin Meurk.
Make sure your camera is focusing on the species. Yes, it's obvious, but a camera's autofocus can often decide to focus on something in the distance rather than the small critter you're photographing. When I'm photographing small flowers or insects with a regular camera or mobile phone, I often need to hold my hand flat in the photo at the distance I want it to focus, then remove my hand before finishing the photo. Most cameras these days also have a macro button or function that you have to turn on so the camera will focus close up. Otherwise, everything close up will be blurry.
Add a scale
Exactly how big something is, whether it be an insect or a leaf, can be important for figuring out what species it is. It's therefore very helpful to include a scale in at least one of your photos. That can be something formal like a ruler, or a coin. Regular Bic ball-point pens are also a handy scale if nothing else is at hand. Like a hand. I usually just use my hand or a finger. You don't need a scale in every picture (they can ruin pretty pictures). Just one or two so we know how big something is.

A ballpoint pen used as a scale for a photo of a fruiting holly.
NatureWatch NZ observation by Jon Sullivan.
You may already have a high-powered telephoto or macro lens in your pocket
Regular cameras and mobile photo cameras often have lens openings about the size of your eye. That means they can take quite acceptable photos looking through anything your eye looks through, like binoculars, a hand lens, or a microscope. Inexpensive binoculars can work just fine. That means that you don't need to be a pro-photographer with a lens the size of a vacuum cleaner to get identifiable photos of birds. You also don't need a fancy macro lens and flash kit to get identifiable photos of small insects. Is your flash too bright when photographing through a hand lens? Cover it with a paper towel or white handkerchief. Got no flash on your phone? Use a torch. Don't expect to win photography awards, but you can get your species identified, and the photos often look pretty good.

A striped mosquito photographed with an iPhone held up to a microscope at 20X magnification.
NatureWatch NZ observation by Jon Sullivan.
Photograph all the bits
If you're photographing a species you don't know, it's important to photograph all the parts that might be important for an identification. For plants, that usually means both sides of the leaf, the stem, and flowers and fruit if there are any, as well as the whole plant. Even a couple of old dried up flowers or fruit can be really handy if they're on a plant.

The stem and stipule of a taupata photographed with an iPhone through a 10X botanical hand lens.
NatureWatch NZ observation by Jon Sullivan.
Some species are just plain tricky and a little knowledge goes a long way. For Coprosma species, a big group of NZ native plants, it's important to know the shape of a little strap of tissue called a stipule that wraps around the stem between each pair of leaves. It can also be important to photograph the domatia, the little holes in some Coprosma leaves that leaf-cleaning mites live in. For insects, things like wing venation and the patterns of hairs can be important so its important to get your focus right. For some flies, there's a little fold called the scutellum between the top of the thorax and the abdomen that's important. For mushrooms, the pattern of the gills can be important to know, so make sure you don't just photograph to the top of the mushroom.
The more you get to know NZ nature, the more familiar you'll get with the right things you'll need to photograph to ensure an ID. It's all part of the journey. But don't panic. Most of the big common things around you can be identified just fine with normal photos.
When photos aren't enough
I should note that some species cannot be identified to species with regular photos. You might only be able to get an insect identified to a genus or family using a photo. That can still be useful. However, if you find something odd that you think is important, like a new pest insect in your neighbourhood, it's also useful to take a specimen. Insects can be preserved long-term in ethanol, or just stuck in the freezer for a few months. Plants can be pressed and dried in newspaper squashed under a few books.
With a specimen, you can photograph other more esoteric parts of it later if someone on NatureWatch NZ asks about it, or you can send the specimen to an expert for identification (e.g., at Biosecurity NZ) should the users on NatureWatch NZ suggest it. Most of the time, a few photos are fine, but if the ID really matters to you and you're not familiar enough with the group to know what features to photograph, consider collecting a specimen. (Note that you need a permit from DOC to collect on conservation land.)
So, there you have it. I hope you found some helpful hints. Have I missed something? Do you have favourite tip you'd like to add? You can add a comment below.
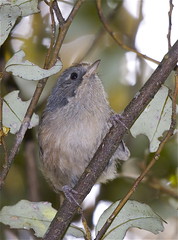
Some photos take a lot of skill and luck, like this amazing photo of the fast moving little forest bird, the brown creeper.
NatureWatch NZ observation by Steve Attwood.
